
Since the first dynamic website was created, the form verification has been an important topic since then. To get user input through the system requires more attention, and there was no standard way of dealing with form formation with previous server-side scripting languages. For this reason, clients have used scripting in many cases, but as you probably know, clients scripting is not bulletproof - it can easily bypass or close the bus. With ASP.NET, web developers were eventually given a good, standard set of tools to validate the forms. ASP.Net's verification control is based on both client side and server-side technology, which brings the best from both worlds, to ensure that it is as easy as validating a form.
ASP Net 2.0, which is the latest version, as I write, comes with many different verification controls for different purposes. In the following chapters, we will show examples of each of them. They all work in different ways, but essentially they do this - they ensure that a form field is filled properly by the user.
The RequiredFieldValidator is actually very simple, and yet very useful. You can use it to ensure that the user has entered something in the text box control. Let's give it a try, and add a RequiredFieldValidator to our page. We will add a text box to validate, as well as a button to submit a form.
<form id="form1" runat="server">
    Your name:<br />
    <asp:TextBox runat="server" id="txtName" />
    <asp:RequiredFieldValidator runat="server" id="reqName" controltovalidate="txtName" errormessage="Please enter your name!" />
    <br /><br />
    <asp:Button runat="server" id="btnSubmitForm" text="Ok" />
</form>
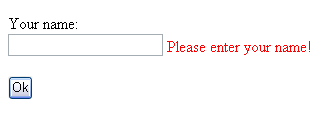
Actually, we all need to examine the most basic part of the RequiredFieldValidator. I am sure that all the properties of control are still understood, so I will not go into details about them. Try to run the website and click on the button you should see something like this:
If your browser supports JavaScript, which is the most modern broker, you will see that the page is not being posted back to the server - verification is clouded! This is one of the really good things about ASP.Net Vedics. Verification is done only on server side if necessary! To see how it looks, you can add Enableclientscript = "false" to RequiredFieldValidator and try again. Now you'll see a browser posting back to the server, but the result will be the same - the validator still works!
Now, the button is nothing, except if posting is legitimate then posting back. We'll change this by adding an onclick event:
<asp:Button runat="server" id="btnSubmitForm" text="Ok" onclick="btnSubmitForm_Click" />
In the CodeBehind file, we add the following event handler:
protected void btnSubmitForm_Click(object sender, EventArgs e)
{
    if(Page.IsValid)
    {
        btnSubmitForm.Text = "My form is valid!";
    }
}
As you will notice, before we do anything, we check whether the page is valid or not. This is very important, because this code will be delivered, if for some reason the client side is not used. Once this serverside validation comes, your job is to ensure that no sensitive code is executed unless you want it. As you see, it's very easy - just the page. Check the ISIAD parameter, and you're good to go try to run the website again, and see how the text of the button is changed if you submit a valid form.